
Here is a straight forward guide on how to dip cake balls, cake pops and truffles as pictured below.

First, you need the stuff.
1} Chocolate or Vanilla Melts/Wafers
There are two different methods you can use to prepare your chocolate for dipping.
1- Use pure chocolate and temper it (that’s another post) or
2- Use a chocolate coating or “melting wafer”
The pure chocolate, as you can imagine, is going to taste better but takes much more time and talent than using chocolate coating. Chocolate coating still tastes good and this is my preferred method at this time.
I use Guittard Vanilla A’Peels or Guittard dark or milk chocolate wafers for all my dippins. I buy these at my local commercial baking supply store that is open to the public. {Orson Gygis} You can also buy them online at a variety of vendors.
You can use any “melting” candy/wafer and it will work too but I have tried different kinds and the Guittard are my favorite because they are high quality, melt thinner and have a really good taste. The Wilton Candy Melts are still quite thick when they are melted and this results in a thicker shell, which I (and many taste testers) do not find desirable. The best part is that you can buy the Guittard melts in bulk (5-10 lb bags) and they can even be cheaper than the Wilton product. Good deal! Either way I would still use the Guittard. In a pinch, Wilton would do.
You can use any “melting” candy/wafer and it will work too but I have tried different kinds and the Guittard are my favorite because they are high quality, melt thinner and have a really good taste. The Wilton Candy Melts are still quite thick when they are melted and this results in a thicker shell, which I (and many taste testers) do not find desirable. The best part is that you can buy the Guittard melts in bulk (5-10 lb bags) and they can even be cheaper than the Wilton product. Good deal! Either way I would still use the Guittard. In a pinch, Wilton would do.
So, how are melting wafers different than chocolate?
Melting wafers are often not actually chocolate…. yeah, disappointing huh? It is actually a vegetable fat-based coating with added flavorings and ingredients. This fat base allows it to be melted easily without the temperament of real chocolate. The good part is that it can actually taste pretty good for not being real chocolate and it is much more fool-proof. They even come in a variety of colors.
So, now that you know about the chocolate (or vanilla)…
2} Melting the Chocolate
There are a few key fundamentals to understand to melt your chocolate successfully.
First, melt slowly over low heat. Chocolate can scorch easily if you heat it too fast and too hot. After being scorched, the chocolate may taste just fine but it will not look as beautiful as you would have liked. It will have streaks or patches of light color throughout the chocolate once it dries because the chocolate and butter fat separates when heated too much…. not the effect we are usually going for.
You can use a double boiler (keeping in mind the next tip) or you can use the microwave.
Heat just until most of the candy is melted, stirring constantly if you are using a double boiler or stirring every 20 seconds or so if using the microwave. When using the double boiler, heat your water to boiling, remove from heat and then place your top pan of chocolate on the water pan. If you keep your double boiler on the heat while you are melting your chocolate you have a much higher likelihood of getting moisture into your chocolate, which leads to our next tip….
Second, NEVER allow water/ moisture into the chocolate. It will seize and look unappealing if you can even continue using it.
What is seizing?
A little background first…. During the refining of cocoa beans into chocolate, all of the moisture is removed resulting in an essentially dry final product. It is actually considered a “dry” ingredient (kind of weird). When you take a dry ingredient and throw just a little bit of moisture into it, I bet you know what happens. It clumps up. When this happens to chocolate, the moisture is causing the sugar in the chocolate product to clump and we call it “seizing”.
Therefore, seizing occurs when a small amount of moisture is introduced into the chocolate resulting in grainy, nasty, lumpy quasi-chocolate goo.
Try it with your kids! It’s a science experiment bound for a blue ribbon!
However, if seizing does occur, DO NOT THROW IT AWAY! You can still use it but not for dipping anymore. It can make a great ganache if you just add some hot cream to it!
3} Coloring Your Vanilla or Chocolate {Optional}
You really don’t want to try coloring brown chocolate….but white chocolate (and of course vanilla) is definitely doable. You can color your vanilla ANY color you want! This comes in handy when you have themed events or just want to have fun.
Referring back to tip #2, you should only use oil-based food coloring. You already know what will happen if you use the water-based food coloring. Oil-based coloring is often called “Candy Coloring” while the water-based coloring is often called “Icing Coloring”. Keep in mind that this can be brand specific so always look for the “oil” or “water” labeling.
When using a custom colored coating, it’s better to make more than you need and save the rest than try to match the exact same color again after you run short. So make a bit more and you can use the extra on another project or even just for drizzling.
Add a little at first to know how dark your color will be then add more as necessary, stirring the color in thoroughly every time.
4} Preparing Your Cake Ball for Dipping
If you dip a freezing cold cake ball into hot chocolate (…not real “hot chocolate”….you know what I mean!) it will only result in tears…. and maybe a few cake balls on your wall (or through it depending on how cold they were and how good your fast-pitch is).
Another physics lesson… As hot things cool, they contract and as cool things heat up, they expand. Therefore, if you have a cold cake ball dipped in warm chocolate, as these both come to room temperature the cake ball is going to expand (busting open your candy coating) and your coating is going to contract or shrink (again, busting your coating) resulting in big cracks.
Therefore, bring your cake balls and chocolate as close to room temperature as possible before dipping.
5} Dipping Your Cake Balls
There are a lot of ways to dip cake balls.
A} The simplest way is to dip and set on a baking sheet. Get a baking sheet ready by lining it with parchment paper. Have your melted chocolate ready to go and get a dipping tool. You can buy a dipping tool or make your own. I personally prefer the 2 prong store-bought kind because it has thinner prongs but they both work fine. As such:
A} The simplest way is to dip and set on a baking sheet. Get a baking sheet ready by lining it with parchment paper. Have your melted chocolate ready to go and get a dipping tool. You can buy a dipping tool or make your own. I personally prefer the 2 prong store-bought kind because it has thinner prongs but they both work fine. As such:

I just had a prong snap off so next time I will be investing in a metal one.
To make your own, just snap off the two middle prongs of a plastic fork. Voila.
To make your own, just snap off the two middle prongs of a plastic fork. Voila.
Throw (gently) your cake ball into your melted chocolate. Make sure it is completely coated and then lift it out using the dipping tool. Don’t stab it…. have the cake ball sit on top of the tool. Allow the excess chocolate to drip off and then lightly scrape the bottom of the cake ball against the rim of the bowl to take off a little more excess. Set it on your baking sheet and drag the tool out from underneath the cake ball. Yum. If you have crumbs on your dipping tool, wipe those off on a dampened towel before moving on. You don’t want crumbs getting in your chocolate.
Disclaimer: This method introduces more moisture into your chocolate than the next method. You may find that after a while your chocolate is not as thin and ribbony as it used to be. This is from the moisture in your cake ball mixing with the chocolate. If you are fast putting your cake ball in the chocolate and getting it out then it becomes less of an issue. FYI.
B} Another method that I like involves a two part process. Take a cake ball in your fingers and dip just the bottom with a very small amount of chocolate and set it on the parchment. You should not have a lot extra squishing out from underneath the chocolate. Repeat for all. Allow them to dry (fridge makes it go faster). Place the cake balls on a rack like this one or similar.

Place the rack on top of the parchment paper on the baking sheet. Using a small ladle, pour chocolate over each cake ball covering completely. Once dry, remove from the rack. Do not throw away all that chocolate on the parchment paper. It will easily slide off into a baggy or tupperware. Save it and remelt it for dipping next time. No waste!
So there you have it. That’s what it takes to dip some cake balls and truffles…
…oh, but what about cake pops?
…oh, but what about cake pops?
This is even simpler because you can use the stick as your dipping tool. You just dip it into the chocolate completely (make sure you cover a little bit of the stick to seal in the moisture), allow the excess to drip off, scrape the bottom lightly against the rim of the bowl and place it on parchment paper. Magnifique!

What if I want my cake pops to be completely round?
In that case, instead of placing them on parchment paper you would stick them into a foam block you can purchase at any craft store. (Just make sure it doesn’t tip over because you put all the cake pops on one side) That’s all. Then you have beautifully perfect little cake pops as such.

6} Decorating Your Cake Balls/Pops
There are a million and one ways to decorate your cake balls, cake pops and truffles and that’s what makes these little guys so versatile! They can be gussied up for a wedding or made into cute little creatures for a birthday party.
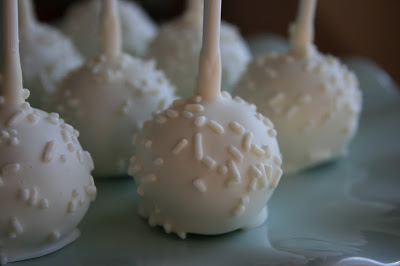
If you want to have sprinkles (or the infamous pop rocks) on your cake pops like so
or

You just sprinkle them with your fingers after you have dipped, say, 5 of your cake balls. The chocolate needs to be wet still so they will stick.
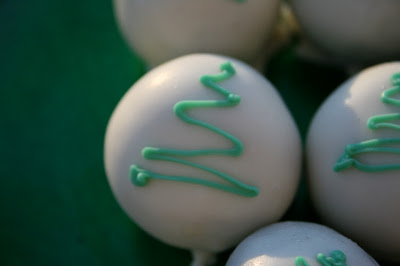
If you want your treats to have drizzles on them…

or

Wait until the dipped chocolate is dry. In the meantime, put whatever color of melt you want (yes, you can use the same color as pictured in the chocolate cake pops above) in a good quality plastic baggie. You usually don’t need a lot. Leave the top open and place inside a microwave safe bowl or cup. Microwave at 30 second intervals, squishing it up each time, until most of the candy is melted. Allow the rest to melt and zip the top closed. Create a little piping bag with the baggie by pushing all of the melt into a corner of the bag and twisting the bag just above it. With some scissors, snip off a very tiny hole in the corner. Try it out to see if it is the thickness you want. If you want it thicker, snip off a tiny bit more. Be conservative.
Once that is done, you are ready to pipe. Press on the bag with consistent pressure as you sweep the melt across the cake ball. Go back and forth across the whole cake ball. If you want to criss-cross it like above, just switch sides and do it again. As you can see, if I am doing a cake pop, I hold the pop at a bit of an angle. When I do cake balls I just go straight across the top while it is still sitting on parchment paper. Like so…

or

You can also drizzle your chocolate into a shape!
Another fun method I really like takes a steady hand or just some practice
but is so cute when it is done.
but is so cute when it is done.

For the above, you allow your dipped chocolate to dry completely and prepare a baggie full of the same color of melt so you can pipe it. You want the size of hole to make a big enough line that the sprinkles can stick to it. Go ahead and draw your design (whatever you want!) and then sprinkle on the non-pareils. You can clean up the lines with a toothpick if there are stray non-pareils. If they look loose, go ahead and give them a gentle tap to keep them in place. These are not good for rough travel because the little non-pareils will start to pop off, so be gentle. Allow to dry.

This uses the same technique except you will use a sanding sugar instead of non-pareils giving you a completely different look! This is my favorite medium to sprinkle these designs with. Try it!
Or you can just go crazy….

But plain also looks real nice too…

If you want to add a sheen to your cake balls you can use luster dusts!

Oh, the decisions!!
Don’t forget, this works for anything you want to dip….. like oreos or other cookies.

Any questions?
I am craving your pink cake balls now! I love them! Those you had pictured at the end of this post are so cute!
This is Lida, by the way, 🙂
Thanks! It's about time to do some more neighbor gifts! 😀
I quite frequently use vanilla a'peels which are essentially just like the chocolate I use but vanilla flavored and white. I actually use them more often than chocolate. I have never tried butterscotch. It does sound intriguing! I am assuming it dried hard and cracked easily which could be remedied by adding a small amount of shortening (like 1-2 Tbsp) to the melted mixture. If that wasn't the problem, then I'm not sure at this point without further details. You can essentially use anything that is made for dipping like melting wafers or add some shortening to chocolate type products so they don't crack when they harden. You can find a lot of different flavor options at bakery supplies stores like Orson Gygi's. Does that help?
Peanut Butter would likely work very well as a glue for the cake/brownie inside these pops. Sounds tasty! Chocolate wafers will harden to contain the cake inside but it may not snap like pure chocolate if that is what you are looking for. Some would snap. It really depends on the product you get and/or how much "fat" is in it. The more fat is in the melt mixture, the softer it will be and may not even harden if there is too much. On the contrary, if you have no fat then you will have issues with your shell cracking when it is drying and hardening especially if there are large gradients in temperature between the cake and chocolate coating.
I would add a small amount of shortening to some regular chocolate chips and experiment. Dip a cake pop and let it dry for a minute and see how it turns out. You can add more shortening if needed!
I never seem to be able to fully cover the cake balls or cake pops with the coating. Does it have to be deeper than the height of the cake ball - or can you sort of swirl it around? It seems like you must need a lot of coating to cover the number of cake balls and/or pops made using a 9×13 sheet cake. Any suggestions on amounts? Thanks!
Dipping straight down is the easiest method. You can also tip the cup on its side and rotate the cake ball. I prefer to just dip it though. Amounts needed do actually depend on the type/brand of your candy melt. Some melt thinner than others. You could start with buying 2 pounds and see if that works. It also depends on how large or small you make your cake balls. You will use less with larger cake balls. Wilton candy melts tend to be thicker when they melt and create a thicker coating. I prefer to use a thinner coating with guittard candy melts. Hope that helps! Good luck!