

Awww. Aren’t they cute? {Rhetorical question}
Well you’re in luck…. they’re as easy as they look.
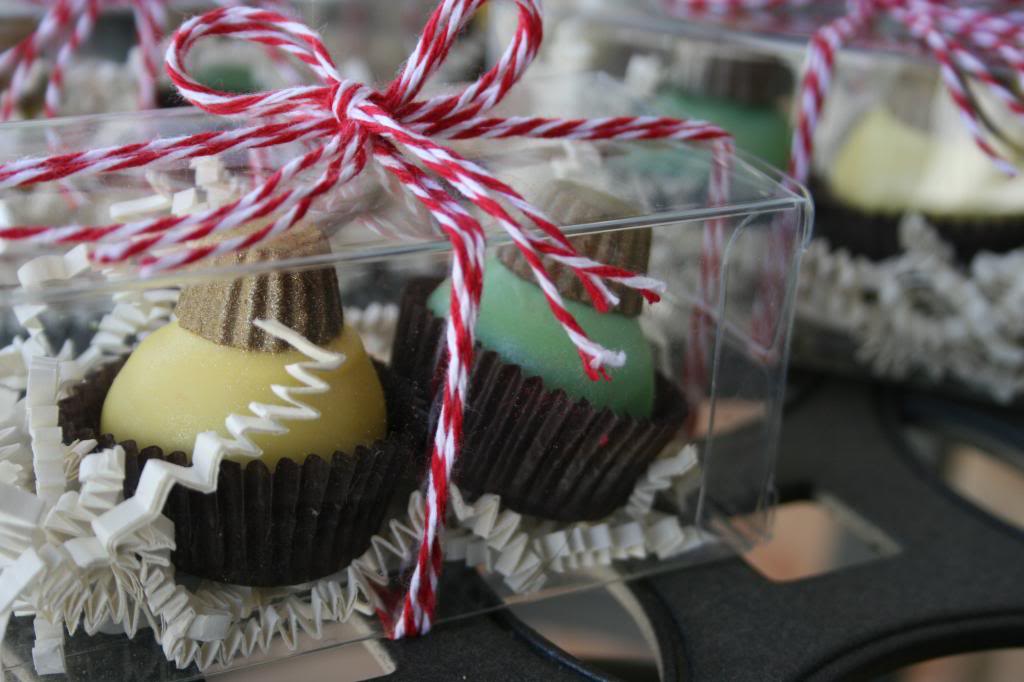
These make fabulous Christmas gifts or you could even make these for a cookie exchange and impress the ugly sweaters off of everyone (…overachiever). These happen to be gorgeous party favors for a Ladies Christmas Luncheon.

I also did red ornaments but didn’t get a chance to take nice pictures of them. You’ll see them later. These pictures don’t really show you what they really look like, unfortunately. I gave the outside of the ornaments a metallic sheen to it.

Undipped cake balls
Candy melts/ chocolate in your preferred colors
Reese’s minis (NOT wrapped miniatures- see pic below)
Edible Gold Spray
Luster/Pearl Dust to match your melt colors
A soft brush
2 x 3″ clear boxes
Shredded paper (I used Ivory colored)
Baker’s twine in your preferred color
Candy cups
First, I want to chat with you about packaging.
THE best place to get your packaging online is from Paper Mart. They have the cheapest prices I have seen even compared to local stores around me. Their orders ship the same day and the whole company is just impressive. This is the only place I buy my packaging from. They have a HUGE selection too.

Ok! So. Step 1
Get your mini Reese’s and edible gold spray out.
I used Chefmaster edible gold spray but I’m not sure I will use this product again. It did not really cover a lot of area and I ran out before I got the effect I wanted. Plus this can was $9. Not worth it in my opinion so I think I will try something different next time.
{If you know of any awesome options, let me know!}

I lined a baking sheet with parchment but I probably didn’t need it at all. I wouldn’t waste it next time.
Cram as many of the mini Reese’s as you can onto the baking sheet allowing some space in between so the spray can get to it. Put the big side down.

I then took it outside so the overspray wouldn’t get on anything, spray back and forth staying about 6 inches away from the mini. Spray all the sides so you get fairly even coverage and you get the desired affect.

Don’t get too close. It will use too much and it doesn’t look the best in my opinion.
See here below, on the left I sprayed too close and it didn’t really look gold anymore, it was more yellow weird looking. Just lightly spray over and over until you get your desired shade of gold.

Below: heavy spray. It kind of took away the shiny gold look.
It looks ok but not what I was going for.

Let them dry and set them aside for when it is time for dipping.
{When you wash your pans (and your clothes), the spray will come right off. It is water soluble.}
Ok. It’s time for dipping.
Dip away. It’s a normal cake ball.
A piece of trouble shooting advice though…
Have you ever gotten that sad rhino skin look on your cake balls?
Like thus.

Or thus.
It’s annoying.
It’s because of the chocolate melt. The melt that is touching the cake ball (that has been refrigerated) cools and hardens faster than the melt on the surface. This causes the melt to harden unevenly and part to start sliding off the cake ball causing ugliness. Boo.
Solution!
“Bounce” off the excess melt faster than you are probably doing it. Don’t just let it drain off on it’s own. I bounce the dipping tool against the edge of the bowl.
This does not allow the melt a chance to harden before the excess drips off.
The result?
Voila.

… and Voila (respectively).

See how pretty! These are the same 2 cake balls in the previous ugly pictures. Yes! You can save them. Yes! It’s a technique thing. Just redip them and shake the excess off faster. That’s it. Yep, nothing to fret about.
… just make sure your melt is not too hot and your cake ball is not too cold as well. This will exacerbate the rhino skin complication. 🙂 Also, thicker candy melts seem more apt to having this problem. ie: Wiltons.
I use a double pronged dipping tool. It’s me favorite. This is how I do it. Not too shabby.

SO! Once you dip the cake balls, allow them to harden ever so slightly before topping it with a gold reese’s mini. If you put it on right away, it may slide off the side or smoosh down in the melt too much and look weird.
After much love you should get thus.

Yay! Now for the fun part. Don’t allow them to loose their tackiness before doing this next step. It works best if they are slightly tacky….like sticky… not like shoddy. That reminds me of a funny story.
So get out your luster dust and brush now.

I am sending you to a link to unravel the mystery behind all the different types of food dusts out there. I found it highly educational and useful. Take a quick look before buying your dust please.
To get a metallic shiny sheen like quality to your candy melts or fondant, you can dust it with luster dust or pearl dust, same type of product. You can dust your cake ball with the powder as I did or you can mix your powder with a high alcohol liquid like vodka or lemon extract to make it more like a paint and get a richer more substantial metallic look.
So just dip your soft brush in the powder and go to town brushing it on the cake balls right on the pan they are sitting on. It goes a long way so be liberal with it and put on as much as you can. You can even go over it a second time if you want.
I used ruby red, yellow and leaf green luster dusts. You can even slightly change the end result on the color of your cake ball by using a different color of luster dust…. ie: brush red dust onto the yellow cake ball and you’ll get an orangey sheen to your ball. 🙂 Fun! Get out your color wheel and have fun!
You can sort of see the sheen of the cake ball in the picture below, more with the yellow. These pictures really don’t do it justice. I’m really sorry. I didn’t have time to play around with my camera to see if I could get better shots. Next time. 🙂
Allow the cake balls to completely harden. During this whole process you will want to handle the cake ball and reeses the least amount as possible so you don’t rub off the powder and sheen. There’s really no need to pick them up until you are ready to package them.


And there you have it. Christmas ornaments fit for your favorite peeps.
TTFN.
{ That’s “Ta Ta For Now” for all of you hermits that have never seen Winnie the Pooh}
WoW!! Just love your musical little ditty and the yummy looking ornaments you created!! There sure is a lot of thought, love and time that you put into all your fabulous creations. You make me smile =) and others too!!
Thanks for all the tips and tricks and taking us step-by-step through the Christmas Cake Ball Ornament Serenade!!